Content Blocks
Content Blocks are useful tools that can add design elements to a landing (home) page.
In order to use Content Blocks to build a page, they must be enabled.
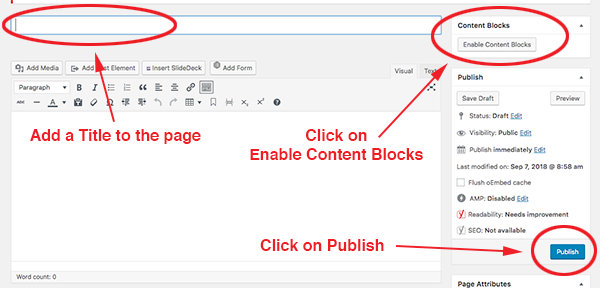
- When adding a new page, after naming the page, press Publish (or Save Draft). Then, go to the Content Blocks box in the upper right-hand corner and press the button Enable Content Blocks.
- At the top of the page, there now appears a box with the dashed line around the frame and is labeled, in the middle of the frame, Add New Block. The page window below the Add New Block box will have 12 vertical bars in two different shades of gray. These are the guidelines for the widths that can be can be used to size Content Blocks across the page.
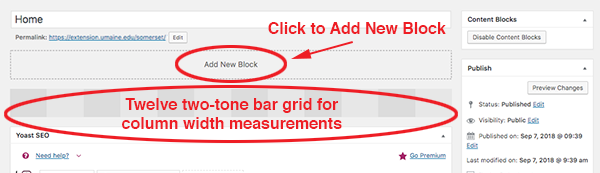
- Click on Add New Block to bring up the Content Blocks menu of various content blocks that can be used to build the page (Article List content block is chosen by default, highlighted in blue).
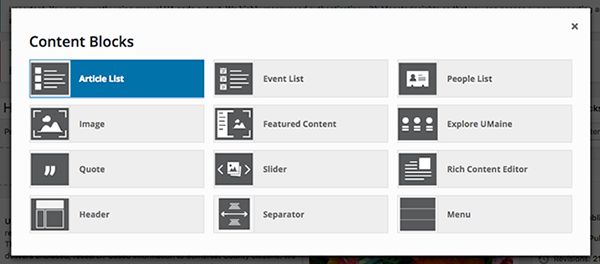
- To use a content block, click on its icon or title in the Content Blocks menu. After clicking on its title, the menu should disappear and the content block chosen should appear on the page.
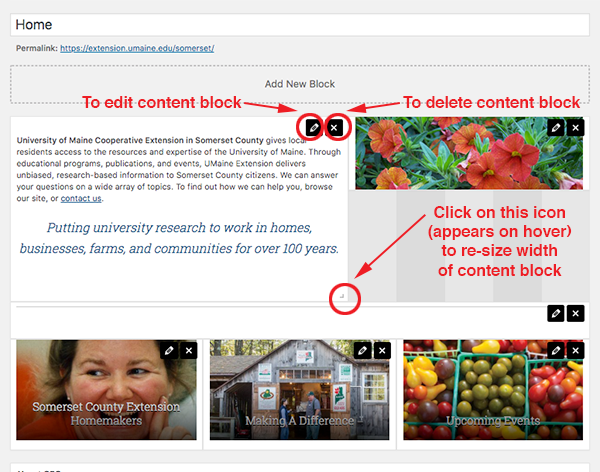
- In the upper right-hand corner of each block, there will be two black boxes. One will have a pencil icon, the box to click to edit the content block. The second box has an ‘X’ symbol, that is to delete the block (which prompts a box, Are you sure you want to delete?).
- In the lower right-hand corner, once you click on the block and hover, a backward-L shape will appear as well as an arrow. This feature will allow clicking-and-dragging the block to its desired width.
Rich Content Editor block
- Add a Rich Content Editor block to your page using the Add New Block/Content Blocks menu.
- Press the edit icon.
- A box will appear on the screen with the title WYSIWYG Setting (What You See Is What You Get) . A title field is provided, however it is not necessary to add a title. Text for your page can be added and formatted here, similar to text editor boxes on a standard web page.
- Once text is added and formatted, press the Save Changes button which appears in the bottom left-hand corner of the content (if you want to leave box without saving changes, click on the ‘X’ in the upper right-hand corner of the block box). Once the Save Changes button is pressed, the page will reappear on the screen (changes must be saved each time the box is edited). Again, press Publish at the right-hand side of the page.
- Resize the block to desired width.
Add another block to continue building the page. The block will appear next to the last block edited or directly beneath.
Image block
- Add an Image block
- Open the image block by clicking on the edit icon.
- A box will appear labeled Image Setting.
- Under Text Alignment, five choices are provided. For the Questions About Gardening image, the fifth option was chosen.
- Next, under Image, press Add Image. Here, you can upload the desired properly sized and optimized image.
- Under Image Scaling, there are two options. Preserve aspect ratio or Crop to 16:9 ratio. On this sample, Preserve aspect ratio was chosen.
- Under Full page width image options, again, there are two choices: Expand to page width and Only inside container. Choose Only inside container.
- If using the image as a button/linked image, add a full URL to the Link field.
- In the Text field, add a headline for your image (or a caption if using as an unlinked image).
- In the Additional Text field, if using the image as a link, add text to the link that will serve as a call to action to the viewer of the page.
- Icon pull-down can be by-passed as it is usually not used.
- Press Save Changes.
If a multiple-image (column) row is desired:
- Add an Image block
- Open the image block by clicking on the edit icon.
- A box will appear labeled Image Setting.
- Under Text Alignment, five choices are provided. For the County Extension Homemakers image, the second option (text centered, bottom, photo overlay) was chosen.
- Next, under Image, press Add Image. Here, you can upload the desired properly-sized and optimized image.
- Under Image Scaling, on this sample, Crop to 16:9 aspect ratio was chosen. This choice adjusts each image to a uniform height and width across the row, making for a more pleasing appearance.
- Under Full page width image options, choose Only inside container.
- If using the image as a button/linked image, add a full URL to the Link field.
- In the Text field, add a headline for your image (or a caption if using as an unlinked image).
- No Additional Text is necessary.
- Icon pull-down can be by-passed as it is usually not used.
- Press Save Changes.
- The block can be resized to build a multiple row column. In this sample, the image block was clicked and dragged across four of the gray bars on the background ‘grid’ of the page.
- Repeat steps for the next two images in the row.
Explore UMaine block
Another way to display and link images is to utilize the Explore UMaine content block. For this feature, images MUST be cropped into a square shape (optimized as well).
- Add an Explore UMaine block from the Add New Block box at the top of the page.
- Add a title to the Block Title field. This phrase should serve as a title to describe the images in this section.
- In the area that is framed with a dashed line, press Add Slide.
- In the Slide Content field, add a brief name/title for the image that’ll be used. This title should describe the page that is linked.
- Add a full URL for the page to the Link field.
- Press Set Image to upload the properly-sized, optimized square image.
- Skip the Position portion until all slides (images) are inserted.
- Repeat the steps above until all slides (images) are placed. (Rows are made of seven images across)
- Once slides (images) are all add, re-position as needed.
- Check the radio box for Expand to entire screen.
- Press Save Changes.
Separator block
To insert a horizontal divider between elements or rows on a page:
- Add a Separator block from the Content Blocks menu.
- A separator will appear as a full-width block on the page. There are no settings provided to edit the separator so it should be used as-is. The only adjustment to be made is the width, however these are generally used as full-width.
NOTE: Content blocks can be dragged and dropped from one location to another, rearranging their order on the page (also widths can be re-sized).
Adapted from “How To” Tips for UMaine Extension Web Managers, University of Maine Cooperative Extension.
Link to Plugged In website